Yoga and the Breath
Uniting the Flutist's Body and Mind
By Laura Barron
PART ONE
INTRODUCTION
As flutists, we are given the opportunity to develop keen breath awareness. However, we perhaps do not realize the full benefits of healthy breathing. Optimal use of our entire respiratory system improves circulation and increases our immunities. Focused attention on the breath reduces stress, improves concentration and creates clarity in the mind. hi order to maximize these benefits, we must practice breath awareness daily, just as we do our scales and tone exercises.
The ancient Hindu practice of yoga provides an excellent vehicle for flutists to balance their body and mind through the deepening of the breath. The term yoga derives from the sansk-rit word yug, which means "to yoke, bind, join, or direct one's attention". Placing focused awareness on the breath unites the body and mind. Pranayama, the control of the life force (prana) through breathing practices, is only one aspect of this 5,000 year old discipline. Also useful to flutists are the physical postures (asanas) and balance poses practiced in Hatha Yoga.
Just as there are many schools of flute playing, numerous yoga traditions have evolved from the original principals of hatha yoga set forth in the ancient Yoga Korunta manuscript. Ashtanga, Iyengar, and Integral yoga are just a few styles which have become popularized in the West. The practices included in this article represent an amalgamated style derived from each of these three schools.
As mentioned earlier, yogic breathing exercises offer flutists obvious benefits. Also, many of the physical poses are designed to increase flexibility in the chest, ribs, spinal and hip regions to help with the full oxygenation of the lungs. Other postures improve range of motion in the shoulder, elbow, wrist, and fmger joints. These poses can provide flutists with greater technical agility and, more importantly, can create resilience against the overuse injuries which are all too common amongst musicians today. Balance postures are also extremely helpful to flutists in that they require the same intense level of concentration needed for sight reading, performing and memorization. And finally, the meditative aspects of yoga provide an excellent tool with which flutists can manage performance anxiety.
Please read through the entire article before attempting the practice in order to develop an understanding of the principles first. Perhaps you may even want to record yourself reading the following pages aloud so that you may use this tape as guidance when you work on the postures. This way you can flow through the practice uninterrupted by your reading.
THE BREATHING PRACTICE - PRANAYAMA
This section will introduce two different hatha yoga breathing exercises: the three part breath (deerghaswasam), alternate nostril breathing (nadi suddhi), and the fire breath (kapalabhati). It is beneficial to begin each yoga session with at least one of these exercises before proceeding to the physical postures (asanas). Each exercise gives the yoga student a chance to shift the attention inward, away from external thoughts and distractions. Cultivating breath awareness brings us into the present moment and allows us to maintain focus throughout our yoga practice by using the breath as a thread to bind our body and mind.
Three Part Breath - Deergha Swasam
Find a comfortable seated or cross-legged position on a cushion or chair. Sit in a meditative pose, close your eyes and begin to shift the attention inwards towards the breath. Then, gently close the mouth and begin breathing through both nostrils. You may find this difficult at first, as it is unfamiliar. However, if the throat is relaxed, nostril breathing allows us to better control the long slow breaths which are most conducive to practicing yoga. Now, place one hand about an inch below the belly button, relax the area around your stomach, and inhale one third of your air. Notice the abdominal muscles expanding and your diaphragm contracting downwards and outwards. This deep breathing is important because it fills the lower lobes of the lungs. This region plays a key role in the oxygen exchange to carbon dioxide because there is greater blood supply there due to gravity.
Next, place your hands around your rib cage with your thumbs oriented towards the back. Inhale the first third of your air again, expanding into the abdominal region, then fill the second third of your lungs and notice the rib cage expanding 360 like butterfly wings. Perhaps this expansion is minimal at first. Become aware of the present state of your breathing without judging yourself, and simply be grateful that you are tuning in. Also, realize that many of the physical postures to follow will help you improve the flexibility of the muscles involved in respiration, eventually increasing this expansion.
Finally, place the fmgers of one hand gently against the breast bone just above the sternum. Inhale into the abdomen and rib cage first, and then allow the last third of your air to enter the chest. Notice how this last expansion presses your hand forwards as your chest lifts. You may fill up to your collarbones; however, try to do so while still relaxing your shoulders down and away from the ears. This is the area where we carry most of our tension; therefore, expansion may be quite limited here. If you already feel fiffl after the ribs have expanded, try inhaling again from the belly upwards. Once you feel full, take a few more strong sniffs in through the nostrils and see if you can inhale a bit of extra air. There will be no place for this oxygen to go other than the upper lungs, so notice if you have now increased your expansion in the chest region.
As you learn to use deep, slow three-part breaths, set an intention to maintain this expansive breathing technique throughout the remainder of your yoga practice. Of course, the mind will drift from this intention at times, but when that occurs, become aware that your attention has wandered and simply return to the breath.
Fire Breath - Kapalabhati
This invigorating practice quickly oxygenates the lungs, waking the mind and heating the body. It also acts to strengthen the abdominal muscles to aid flutists with support and breath control. This exercise should be done on an empty stomach and avoided if you have high blood pressure, heart problems, herniated discs, or if you are pregnant. In your seated position with opened eyes, take one full inhalation through both nostrils and then vigorously kick the diaphragm inward to create continuous short exhalations through the nose at the rate of one per second. Between each panting breath you may passively allow a short inhalation into the lungs. Continue these diaphragm kicks for up to 30 exhalations and resume a normal breathing pattern for about 10 breaths. Begin another round of fire breaths, rest again and then complete a third and final round. Be careful not to inhale too much between exhalations as this may lead to dizziness or hyperventilation. You will feel this practice generating heat in your system which you should invite because a warm body, like metal, bends much more easily. Therefore, kapalabhati prepares you for the following yoga postures.
THE POSTURES - ASANAS
Every balanced yoga practice includes a comprehensive sequence of poses which work the upper and lower body equally. Forward, backward, and side bending as well as twisting postures provide a balanced routine. Throughout the practice, attention to the breath is paramount. Each movement is synchronized with either an inhalation or an exhalation. As in your pranayama exercises, breathing occurs through the nostrils and the flow between breaths is constant.
In this article, each yoga pose will be introduced with several modifications so that every student can suitably adapt the practice to their needs. It is important to understand that we are developing body awareness during our yoga practice. Although we will come to realize our limitations we never work beyond them in the practice. You must always listen to your body and work only to the point where you are stretching not stressing the body. Everyone's practice varies greatly, but it as still yoga as long as it feels like an opening for you. The sequence which will be provided in the following issues has been specifically designed to address the flutists' mind body issues. You will be able to complete the series in an hour if you include both breathing practices.
PART TWO
Yoga can be practiced anywhere as long as you have either a comfortable blanket or a sticky mat. For certain poses, you may also wish to use a small pillow and a towel as props. With these simple materials and an open mind you are ready to begin your practice.
1. Neck Rolls
Sitting as you did for the breathing exercises, become aware of your head and neck. Imagine that a string, aligned with your spine, is suspending your skull through the crown of your head. Using this imagery in each pose you protect the delicate nerve centers at the back of the neck by creating length. This length should also be maintained at all times while playing the flute, even if you turn your head slightly while you play. Now, inhale raising your right arm, and exhale gently taking hold of your left ear and press it towards your right shoulder. Hold here for five breaths, release to center on your last exhalation and then repeat on the opposite side.
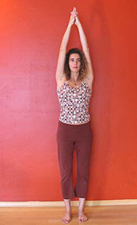 2. Mountain Pose - Tadasana
This pose begins the standing portion of your practice. Place your feet at the front of your mat with your heels and big toes touching. Lift your toes, spreading them wide, and then replace them on the mat and grab the floor, using your toes like fingers. This truly roots you into the ground. Now, you can rock from side to side and back to front until you feel centered. Be careful not to lock your knees, bending them slightly to square your hips over your heels. Next, raise your shoulders to your ears, tense them, and then allow them to release down and back. You want to imagine arrows pulling your shoulders out, perpendicular to your body, in order to create space in the chest and between the shoulder blades for good alignment and respiration. This also helps flutists avoid the hunched and rounded shoulders often caused by playing our instrument. Using nostril breathing, maintain the completed mountain pose for a few breaths, internalizing its strength and stability. This is the posture to which you will always return between each standing pose.
3. Arm Elevations
This posture will teach you to raise your arms with greater ease and will help you sustain the position needed to support the flute effortlessly. Inhale and lift your arms to your sides, palms down, until they are parallel with the floor. Do so while imagining air balloons inflating beneath your arms to provide support from below. This image will help you to avoid lifting too much from the shoulders which typically causes so much tension for flutists. Hold this pose for five deep breaths. Then, on your next inhalation turn your palms towards the sky. Exhale and allow your right fingers to drop towards the floor. You can hold this pose for five breaths as is or drop your left ear towards your left shoulder to increase this intense stress to the nerve strands that run down your arms. Lift your right fingers and repeat the pose on the opposite side. Remember to cease holding the pose if at any time your limbs feel numb or painful.
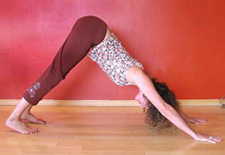
4. Sun Salutation - Suryanamaskara
This flowing sequence of poses combines forward and backward bending, providing a full body stretch with which to warm-up in your practice. Once you come to love doing yoga, you will find yourself looking for time to practice daily. If you have only 5 or 10 minutes on certain days, the sun salutation, alone, offers the perfect condensed routine.
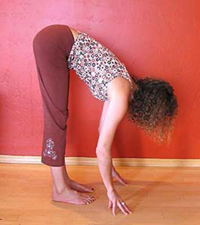
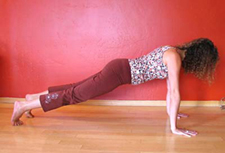
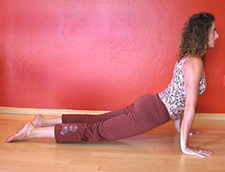
Begin in mountain pose. Inhale, raising your arms over your head, palms touching if possible, and keep your elbows in towards your ears. Exhale, fanning the arms out towards your sides, hinge at the hips and fold forwards, keeping a straight spine. On the next inhalation, lift the torso lightly correcting any rounding that may have occurred in your back. Now exhale and bend your knees until your palms touch the floor along side your feet. Inhale, placing your knees as far back on the floor as possible, curling your toes under, and then work into a push up on the exhalation. You can do so without creating too much stress on your upper arms by first lowering your chest and chin to floor with a lifted and arched pelvis. Your elbows should remain close to the body and point backwards as you do this. Next, slide your hips forwards, coming onto the tops of your feet, and allow your hips to lower towards the floor. This all happens smoothly during one out breath. Now, inhale, lifting the torso off the floor, and arch the back slightly in a cobra pose. Then, exhale, curling your toes under again, lift the tail bone to the ceiling, work your heels towards the floor, and hold yourself in downward dog for another in and exhalation. If this pose causes discomfort in your wrists, you can try the table pose modification. Simply bring your knees to the floor instead, aligning your shoulders with your hands and your hips over your knees. For those in full downward dog, after one breath, inhale and work your right foot forwards between your hands, lunging, lifting your left heel off the floor, and gazing up slightly. Those in table pose should bring their right foot forwards as well leaving the left knee on the ground. On the next exhalation, either place the right knee back with the left or come into full downward dog. Now, proceed with a lunge on the left side during an inhalation. Exhale into downward dog or table one last time, now holding the pose for five deep breaths. If you are in table pose you can add alternative cat stretches during these five breaths by creating a concave arch in the spine on each inhalation sequencing from the tailbone up to a lifted neck and head. Then, curl your hips under on the exhalation sequencing through the spine until it is in a bridge position with your chin tucked in towards your chest. Listen to the body and try the modification at any point if the full pose is too strenuous. Your wrists will become much more flexible as you practice your sun salutes regularly.
Now, inhale and walk your feet back between your hands lifting your tailbone, straightening the legs and gazing up. Exhale, folding forwards once more with a flat back. Then hinge at the hips, inhaling as you return to mountain pose, raising your arms over head again. Finally, on your last exhalation, lower your hands to prayer position at the heart center, expanding your chest region and then relax the arms along side the body. You have now completed your first sun salutation. Swyanamaskara should be practiced five times, in a continuously flowing manner, to properly create enough heat in the body for the remaining poses.
 |
 |
Forward Bend |
Push Up |
 |
 |
Upward Dog |
Downward Dog |
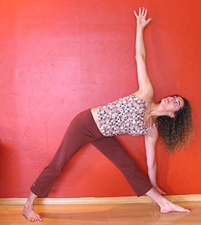 5. Triangle - Trikonasana
For this side stretch, turn towards the side of your mat, spreading your feet one leg’s distance
apart(approximately 3 - 4 feet ). Turn your right foot out to 90, aligning your heel with the inside of your left arch. Also, turn your left foot in slightly to protect the lower back. Inhale, effortlessly bringing the arms to parallel with the floor, palms facing down; however, keep your shoulders relaxed and away from the ears. Next, reach your right hand towards your side, shifting your torso on an out breath. Still exhaling, maintain length in your waist and fold sideways at your hips as far as is possible while still curling your left ribcage towards the ceiling. This prevents spinal twisting. Now, allow your right hand to fall along your leg wherever it is comfortable or bring it all the way to the floor if possible. Hold for five deep breaths making sure that you are breathing equally into both lungs so as not to collapse the right side of the body. Then release the pose by pulling your left hand towards the ceiling on an inhalation and hinge back to center. Exhale, reversing the feet, and proceed with the entire pose on your left side. Notice how much space is created between your ribs on your skybound side during this pose. This greatly helps to increase your breath capacity.
6. Forward Bend -Prasarita Padotanasana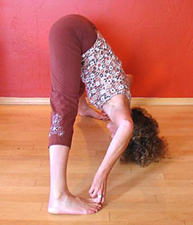
After you have completed triangle pose, you can flow into this forward bend by turning your feet to parallel with your legs still spread apart. Now, turn your toes in lightly for lower back support, inhale and again bring the arms parallel to the floor. On an exhalation, place your hands on the hips, and hinge at the waist with a long spine until your fmgers can take hold of your big toes. You may bend your knees if you need. To correct any rounding in the back, lift your torso slightly on an inhalation and then fold forwards even further as you exhale. If possible, bend your elbows out towards the sides and hold this posture for five long, slow breaths. If your knees are bent, work to straighten them progressively with each exhalation. With extended legs, you can also improve the pose on each out breath by using the strength of your upper arms to pull against your toes as you fold your torso more deeply forwards without rounding your spine. To come out of the pose, inhale with your hands on your hips and return to a standing position. Still inhaling, place your thumbs further behind your back for support and arch backwards a bit for a counter stretch and then return to center on an exhalation.
For a second chest expanding variation of this pose, bring your arms behind your back, interlocking your fingers, and press your palms together on an inhalation. Now, pull your hands away from your torso in a forward bend. By truly releasing any tension in your shoulders and surrendering to gravity, you can perform this posture with greater ease. Again, remain folded for five breaths and then lift your torso out of the pose by pulling your hands towards the ceiling first on an inhalation. Follow this with another counter stretch and then exhale and return to center.
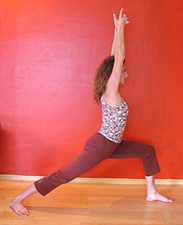 7. Warrior - Virabhadrasana
For a modified pose, begin in your table position, inhale and work your right foot next to the inside of your right hand keeping your left knee on the ground in this lunge. Then, raise your arms over head, keeping your elbows in towards your ears, press your palms together and lift your gaze slightly while keeping the neck soft. Also, if you are struggling to straighten the arms, you can interlock your bottom three fingers while extending your index fingers and thumbs to help you achieve length. Hold this posture for five breaths. Imagine a weight suspended from your tailbone dropping towards the floor with each exhalation in opposition to your hands lifting with each inhalation. Try to develop an awareness of your cellular breathing by sensing the movement of your breath extending into the expansion and contraction of every cell from your fingertips down to your toes. No yoga pose is static. The breath constantly moves us as it does our music.
If you begin this pose, instead, in downward dog, it is possible to try a more strenuous variation of warrior by turning your left ankle in 45 and then walking your right foot forwards. Keep the left foot rooted by pressing the outside of the foot into the floor. Your hips should be squared to the front of the mat. Now, proceed as you would in the modified version but make sure that your knee is aligned just above your ankle so as not to hyper extend the knee joint. Hold this pose for five deep breaths. Feel the strength and vitality the warrior pose brings to your mind and body. You can bring this state of focused clarity to any performance situation. On your last exhalation, walk your right foot back with the left or if you are doing the modification, bring your right knee back with the left, and lift into either table ordog pose. Repeat each step on the opposite side and then resume dog or table pose. Finish the posture by walking both feet between your hands and complete the latter half of your sun salutation until you return to mountain pose. You are now ready for your first balance pose.
8. Tree - Vikrasana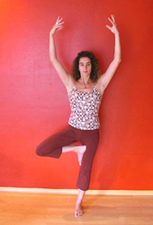
Focus is central to your yoga and music practice. Balance postures are ideal for cultivating this aspect of the mind. Return to the front of your mat, placing your feet together and shift your weight to your left side. Firmly root your left foot by using strong toes to grab the floor and create a supportive bridge with the arch of your foot. Contract your left thigh so that this leg feels like a stable tree trunk. Now, inhale and lift your bent right leg which should now feel empty. Interlock your fmgers around your knee, exhale, and hold. On your next inhalation, hug your knee into your chest and hold through one breath. Now, inhale and cradle your right foot in your left hand and open your right hip by dropping your knee towards the side. Finally' exhale, place the sole of your right foot on the inside of your left contracted thigh, release your left hand and take hold of your ankle with your right hand. If you are stable, bring your hands to prayer position at the heart and remain balanced for five breaths. Fix your gaze ( dristi) towards a spot on the wall or floor in front of you to help you concentrate. Use your dristi and prana as centering forces in all balance postures. After your last breath, release, your foot to the floor and repeat this pose on the opposite side. Remember that the object is to improve focus and stability; therefore, you should only hold this pose at a level with which you feel comfortable. If you find yourself shaky at any stage just return to the previous step and hold there. Some students may just try standing on one leg with their empty foot slightly elevated and they may still receive the same benefits from this pose.
PART THREE
9. Seated Forward Bend - Pashimottanasana
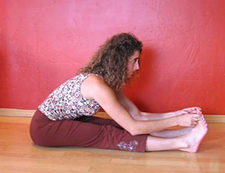 From your seated position, pull the fleshy part of your buttocks
to the side, allowing you to rest directly on the pelvis bone. Then,
inhale and lift your arms over your head, bringing your palms together with
your elbows in close to the ears. Maintaining this nice length in the
rib cage, fold forward at the hips on an exhalation, flexing the feet as you
do so to increase the stretch to the back of your legs. Take hold of
your legs wherever is comfortable for you, perhaps on the underside of your
thighs, calves, ankles, toes, or feet. Inhale once more, still holding
the legs, and arch upwards slightly to unround the spine. Now, pull your
torso towards your legs on the next exhalation, keeping your back flat, and
allow your elbows to bend out to the sides if they need. Instead of working
to bring your chest towards your knees, imagine that a string is pulling your
belly button towards your thighs. Use the strength of your arms to pull
yourself deeper into the pose. Hold this for five breaths, lengthening
the spine on each inhalation by stretching the crown of your head away from
the tailbone, and then fold forwards a bit more with each exhalation. Flexing
the feet in this pose will offer a greater stretch to the back of the legs. Forward
bends also have a calming effect on the mind and can be used to manage performance
anxiety. Finally, extend your arms forward on your last exhalation in
preparation for your return to a seated posture. Then, inhale, unhinging
at the hips, press your palms together overhead and release them along side
thebody on an exhalation.
From your seated position, pull the fleshy part of your buttocks
to the side, allowing you to rest directly on the pelvis bone. Then,
inhale and lift your arms over your head, bringing your palms together with
your elbows in close to the ears. Maintaining this nice length in the
rib cage, fold forward at the hips on an exhalation, flexing the feet as you
do so to increase the stretch to the back of your legs. Take hold of
your legs wherever is comfortable for you, perhaps on the underside of your
thighs, calves, ankles, toes, or feet. Inhale once more, still holding
the legs, and arch upwards slightly to unround the spine. Now, pull your
torso towards your legs on the next exhalation, keeping your back flat, and
allow your elbows to bend out to the sides if they need. Instead of working
to bring your chest towards your knees, imagine that a string is pulling your
belly button towards your thighs. Use the strength of your arms to pull
yourself deeper into the pose. Hold this for five breaths, lengthening
the spine on each inhalation by stretching the crown of your head away from
the tailbone, and then fold forwards a bit more with each exhalation. Flexing
the feet in this pose will offer a greater stretch to the back of the legs. Forward
bends also have a calming effect on the mind and can be used to manage performance
anxiety. Finally, extend your arms forward on your last exhalation in
preparation for your return to a seated posture. Then, inhale, unhinging
at the hips, press your palms together overhead and release them along side
thebody on an exhalation.
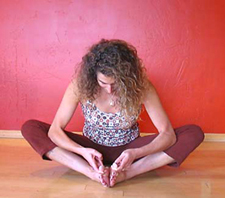 10. Butterfly - Baddha Konasana
For the following hip opening posture, bend your knees, press the soles of your feet together and interlock your fingers around your toes on an exhalation. As you inhale, pull against your feet and straighten out your spine until you are sitting fully erect in a right angle. Now, begin to exhale and lower your torso forwards, bending your elbows and pressing them into your inner thighs as you fold. For a greater hip stretch, you can place your thumbs on the inside of the balls of the feet and open your feet out like a book, continuing to press your elbows into your thighs. Hold this for five breaths, deepening the stretch on each exhalation. Remember that upper body tension can stem from tight hips. Also, opening the pelvic region enhances breathing. Return to center on your final inhalation allowing the knees to rise.
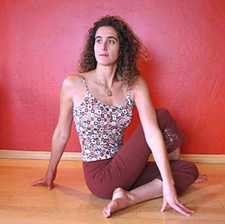 11. Spinal Twist - Ardha Matsyendrasana
You have now worked your vertebrae forwards and backwards, so the following pose provides a balance by creating lateral range of motion in the spine. Place your left heel in front of your right buttock as you inhale, and lower your left knee to the floor. Exhale, bend your right knee and place the sole of your right foot into the floor in front of your left ankle. Now, inhale wrapping your right arm behind your body and press the heel of your right hand into the floor in front of your tailbone, straightening out the spine. Then, hug your right knee with your left arm and begin twisting your torso towards the right on an exhalation. You are rotating from the tailbone up so do not lead with your head or neck just allow them to follow the spine. See if you can place your gaze (dristi) on a spot a little further behind the body with each exhalation to increase the twist. After holding for five breaths, unwind your spine on the last exhalation frame by frame, making this the slowest move of your entire practice.
 12. Bridge Pose - Setu Bandasana
For one last counter stretch to the spine, this backward bend complements your practice. Begin by taking in a deep breath and then as you exhale lower yourself into a reclined position with bent or straight legs (the latter requiring more abdominal strength). Lower one vertebra at a time, using intelligence and control. Now, bend your knees until your feet are about 6 inches in front of your buttocks, shoulder width apart. On the next in breath, you can begin lifting your pelvic bone to the ceiling, pressing your palms into the floor while keeping all of the weight on your shoulders instead of the neck and head. To make this easier, try tucking your shoulders and elbows underneath the body, while continuing your deep breathing. If your hands can reach, interlock your fmgers just below the tailbone and press your hands into the floor as you increasingly lift your hips on each inhalation. Otherwise, your palms remain pressed into the floor. After five breaths, exhale, slowly sliding the arms back to your sides, and lower your spine carefully towards the floor. When your tailbone has touched the ground, extend your legs out in front and rest here for a moment.
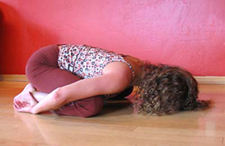 13. Child's Pose
For the next beautiful counter pose, turn your body to lie face down, placing your hands along side your chest and lift yourself onto your knees as you inhale. Continue to rotate around your knees on an exhalation until you are sitting on your heels. Your ankles can open out to the sides for comfort. If your quads are tight, your buttocks may not be able to reach your heels, in which case you may want to place a pillow over your ankles to fill in the gap. Now, rest your forehead on the floor and drop your arms along side the body, palms up, melting yourself over your thighs completely to relax into the protectiveness of this fetal position. Soften your breath and hold this pose for as long as you need to prepare for the final deep relaxation. To come out of the pose, bring your hands next to your knees and lift your torso into a seated position as you inhale. Then, exhale, shift onto one hip and slide your feet out from under you, rotating them around front until your legs are fully extended.
PART FOUR
14. Deep Relaxation - Savasana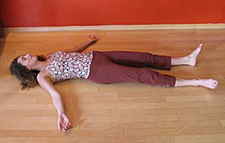
During this final portion of your practice the body will cool down, so take this opportunity to grab an additional layer, blanket, or towel for warmth. Then, take in one last deep breath and exhale slowly as you release your torso to the floor with intelligence, vertebrae by vertebrae. As mentioned before, lowering with straight legs requires quite a bit of abdominal strength, so you can bend your knees before lowering for an easier alternative. Once you are reclined, gently close the eyes, quieting the mind and body as you allow your breath to become more passive and shallow. Drop your feet to either side, releasing the hip joint. Then, slide your arms away from the body until they are comfortable, with palms up or down, and let your shoulders melt into the floor. This pose allows you the opportunity to scan the entire system for any remaining tension. During your journey of awareness, if you notice an area of stress, visualize positive, peaceful energy surrounding this place until you can release it into a state of total relaxation.
Begin by placing your attention on the toes. Imagine a warm, white light entering the soles of the feet, travelling through the ankles into your calves, knees and thighs, until your legs feel completely free. Now, forget about them as you shift your awareness to your spacious hips. Let the light circulate through the pelvic region and then move your mind towards your fingers. As this calming energy enters the palms, enjoy the rest you are now giving the hand joints from which you often demand so much. Allow the sensation to travel up the forearms, elbows, biceps and triceps, softening each muscle and joint along the way. Now, loosen the shoulders where we carry so much of our tension. Realize that they no longer have to hold up your heavy head in this gravity assisted pose.
Notice your breath becoming increasingly easy throughout the deep relaxation. Feel your abdomen gently rising and falling with each baby's breath. With each inhalation you are bringing health to the whole body, exhaling any illness. Breathe in serenity and exhale any worries or concerns. Allow the torso to become permeated with warmth and light until the energy enters your open throat. Become aware of your neck softening, and then move your awareness behind the skull, and over top of your head.
Now, let the sensation relax each muscle of the face, one at a time. Feel it pouring down your forehead, into your eyebrows, eyelids, eyeballs and temples. The energy then drips down the bridge of your nose into your cheek bones, releasing your jaw. Relax your chin, lips, teeth, and tongue letting everything go. You may no longer be aware of the body as physical form, its outline disappearing into a field of peaceful energy. Rest in this state for a moment, placing your attention on the blue, black space just behind the eyes. This is where your inner peace lies. Here you can realize your true nature and remember that it is always there to return to in moments of stress caused by the demands of daily life.
After you feel fully rested, you can return to full consciousness by wiggling your fmgers and toes, rolling your head from side to side and making any additional movements that your body is asking you to make at this time. Then when you are ready, hug your knees into your chest and give a massage to your lower back by rolling in circles around the tailbone. Now, maintaining this fetal position, roll onto your right side, release your hands and rest your forehead and palms on the floor for a moment. Then, keeping your knees bent, press your palms into the floor and lift your torso into a seated pose without straining the back. Now, turn towards the front of your mat, come into a comfortable cross-legged position, rest your wrists on your knees and finish the practice with a few minutes of silence. You can use this time to be grateful for your health, to be still, to watch your thoughts pass through the mind without engaging in them, or to set an intention to carry this peaceful state into any aspect of your life. Whatever you choose, remember to value yourself for bringing your mind and body to this yoga practice. The benefits of this discipline are sure to be reflected in your flute playing and music making.
Yoga is most usefulwhen practiced at least three times a week. There are many helpful videos and books available to encourage you to maintain your practice. I have suggested just a few here and I wish you luck as you begin this journey of self-discovery.
Laura Barron is the Assistant Professor of flute at Northern Arizona Univeristy and a yoga instructor living in the mountains of Flagstaff, Arizona. She enjoysincorporating the principles of yoga into her performance career as a solo, orchestral and chambermusician. Ms. Barron has also taught yoga workshops and flute master classes throughout North America and iscommitted to imparting these same principles to her students at beginner through professionsl levels.
Recommended Readings
Alexander, F. Matthias, The Alexander Technique
Al Huang, Chungliang and Lynch, Jerry, Thinking Body, Dancing Mind
Fahri, Donna, The Breathing Book
Fahri, Donna, Yoga Mind, Body, and Spirit
Feldenkrais, Moshe, Awareness through Movement – Health Exercises for Personal Growth
Goldstein, Joseph, Insight Meditation
Lieberman, Julie Lyonn, You Are Your Instrument
McGee, Charles T. and Chow, Effie Poy Yew, Qigong – Miracle Healing from China
Ristad, Eloise, Soprano on her Head
Siler, Brooke, The Pilates Body – The Ultimate at-home guide to strengthening, lengthening, and toning your body without machines
Werner, Kenny, Effortless Mastery
Recommended Videos
Kripalu Yoga’s Video Series including: Gentle Yoga and Partner Yoga
Yee, Rodney, The Art of Breath and Relaxation, AM and PM Yoga for Beginners and Yoga Remedies for Natural Healing
Yoga Journal’s Video Series including: Yoga for Beginners, Yoga for Flexibility, Yoga for Relaxation, Yoga for Meditation, and Yoga Basics